How to Renumber your IP Address
For anyone requiring additional support through the IP renumbering process, please follow the below guides explaining the necessary steps and commands.
- Windows Server (2012 onwards), Windows Desktop | Download PDF
- Ubuntu Server (18.04 onwards) | Download PDF
- CentOS (7, Stream 7 and Stream 8 onwards) – May also apply to recent RHEL releases | Download PDF
Windows Server
Applicable to the following operating systems:
- Windows Server 2022
- Windows Server 2019
- Windows Server 2016
- Windows Server 2012
- Windows Desktop (10 & 11, with differences in user interface)
Step by Step Process – via RDP (Remote Desktop Protocol)
First, connect to your server via RDP using the Microsoft Remote Desktop client. You will need to log in using either the Administrator account, or a user account with Administrator permissions.
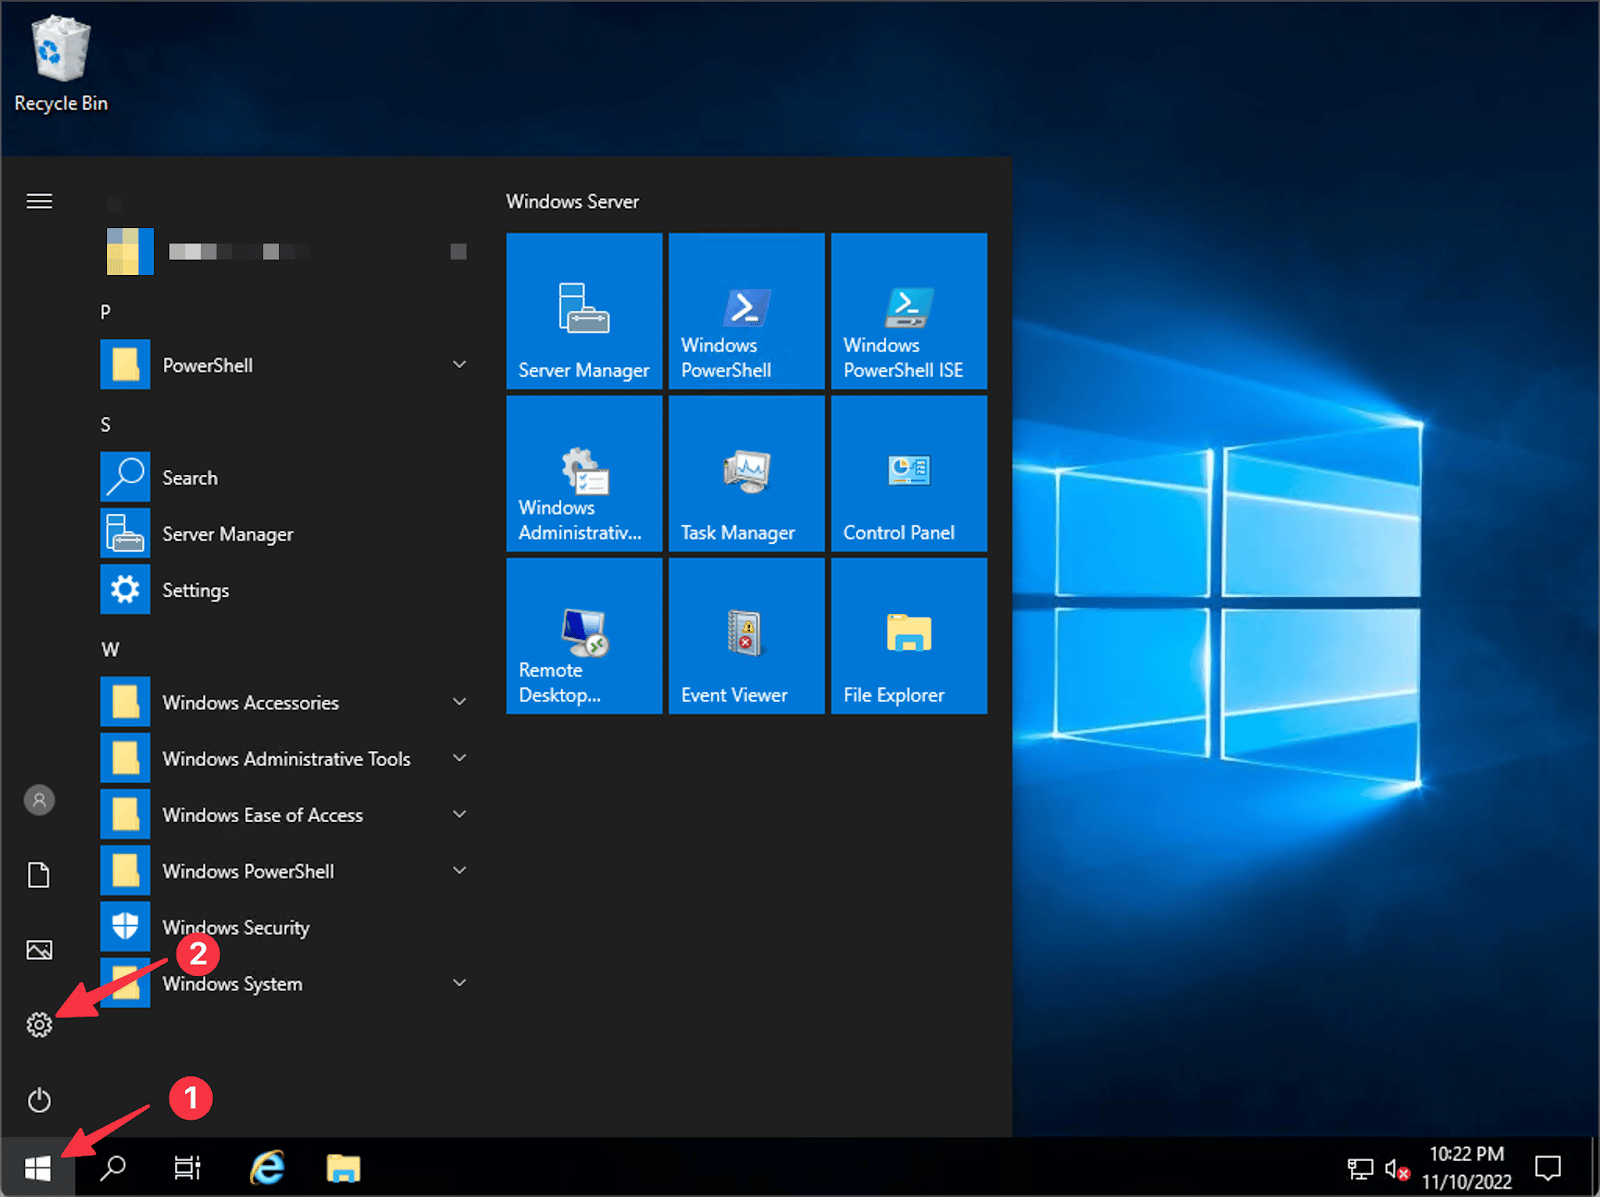
Once connected, click Start (1), then Settings (2).
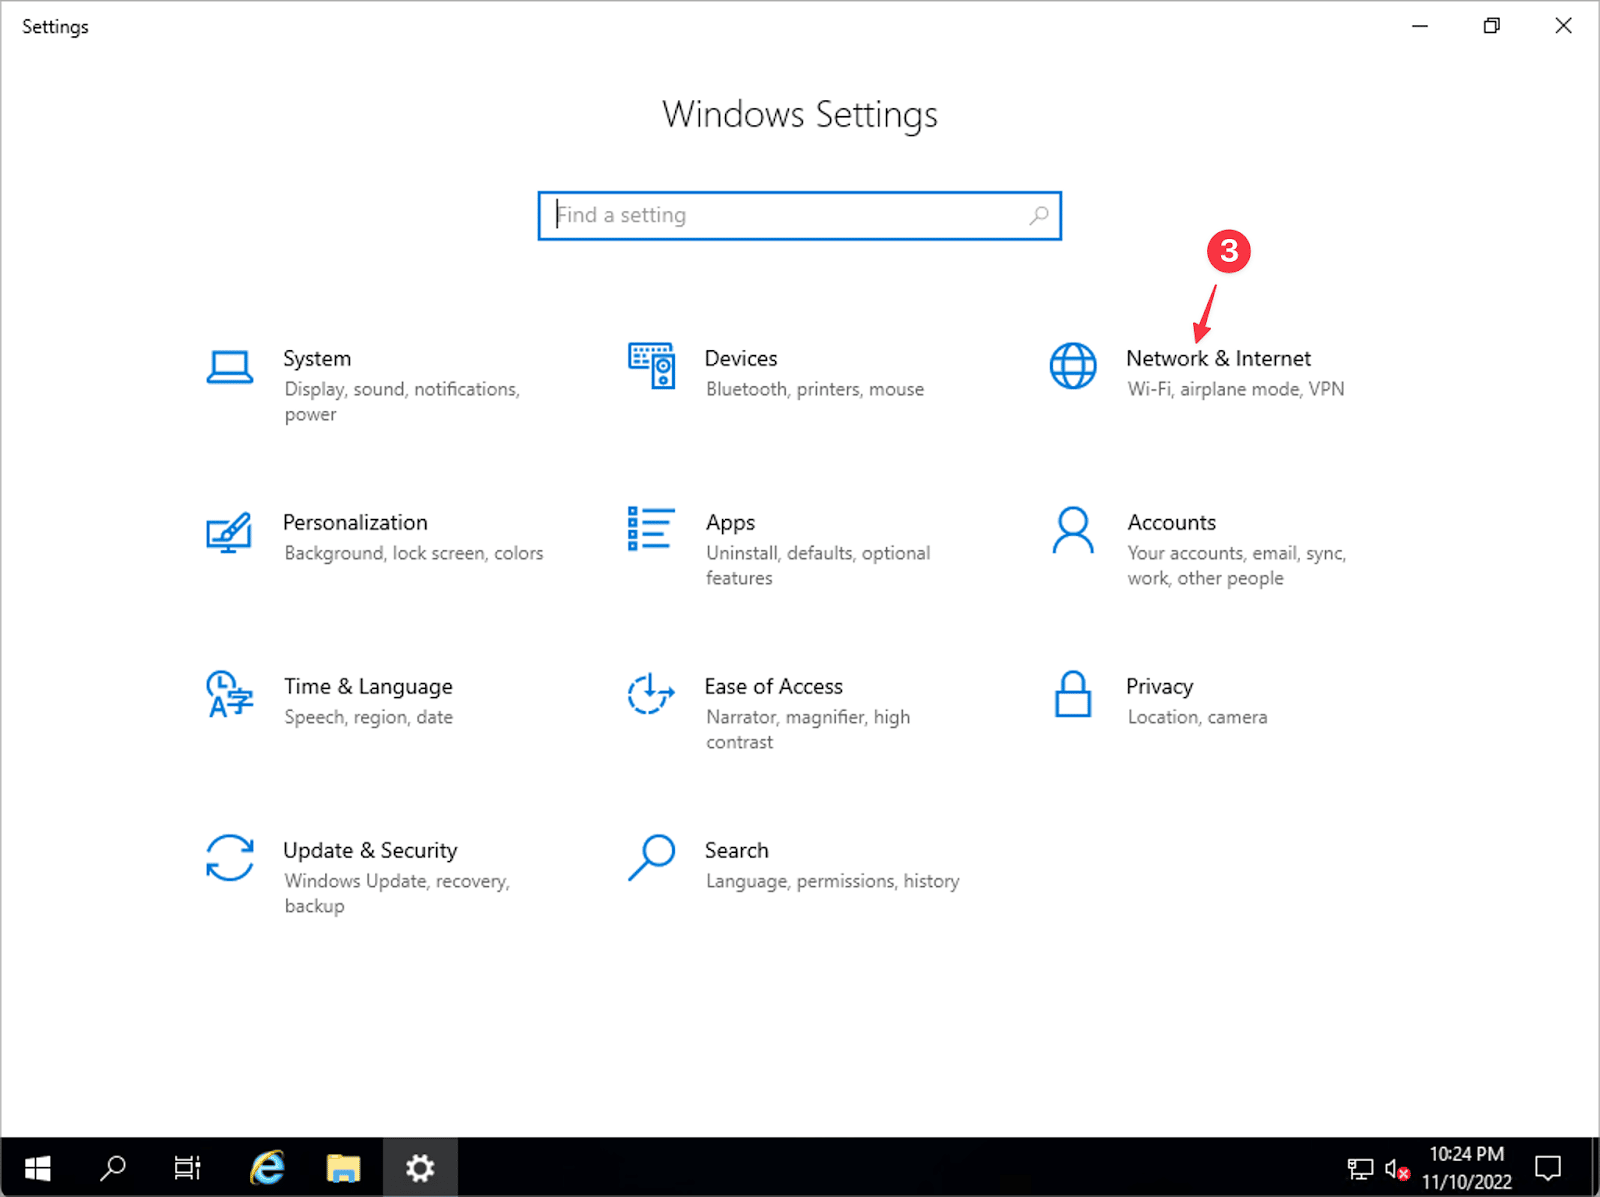
Open the “Network & Internet” settings panel (3).
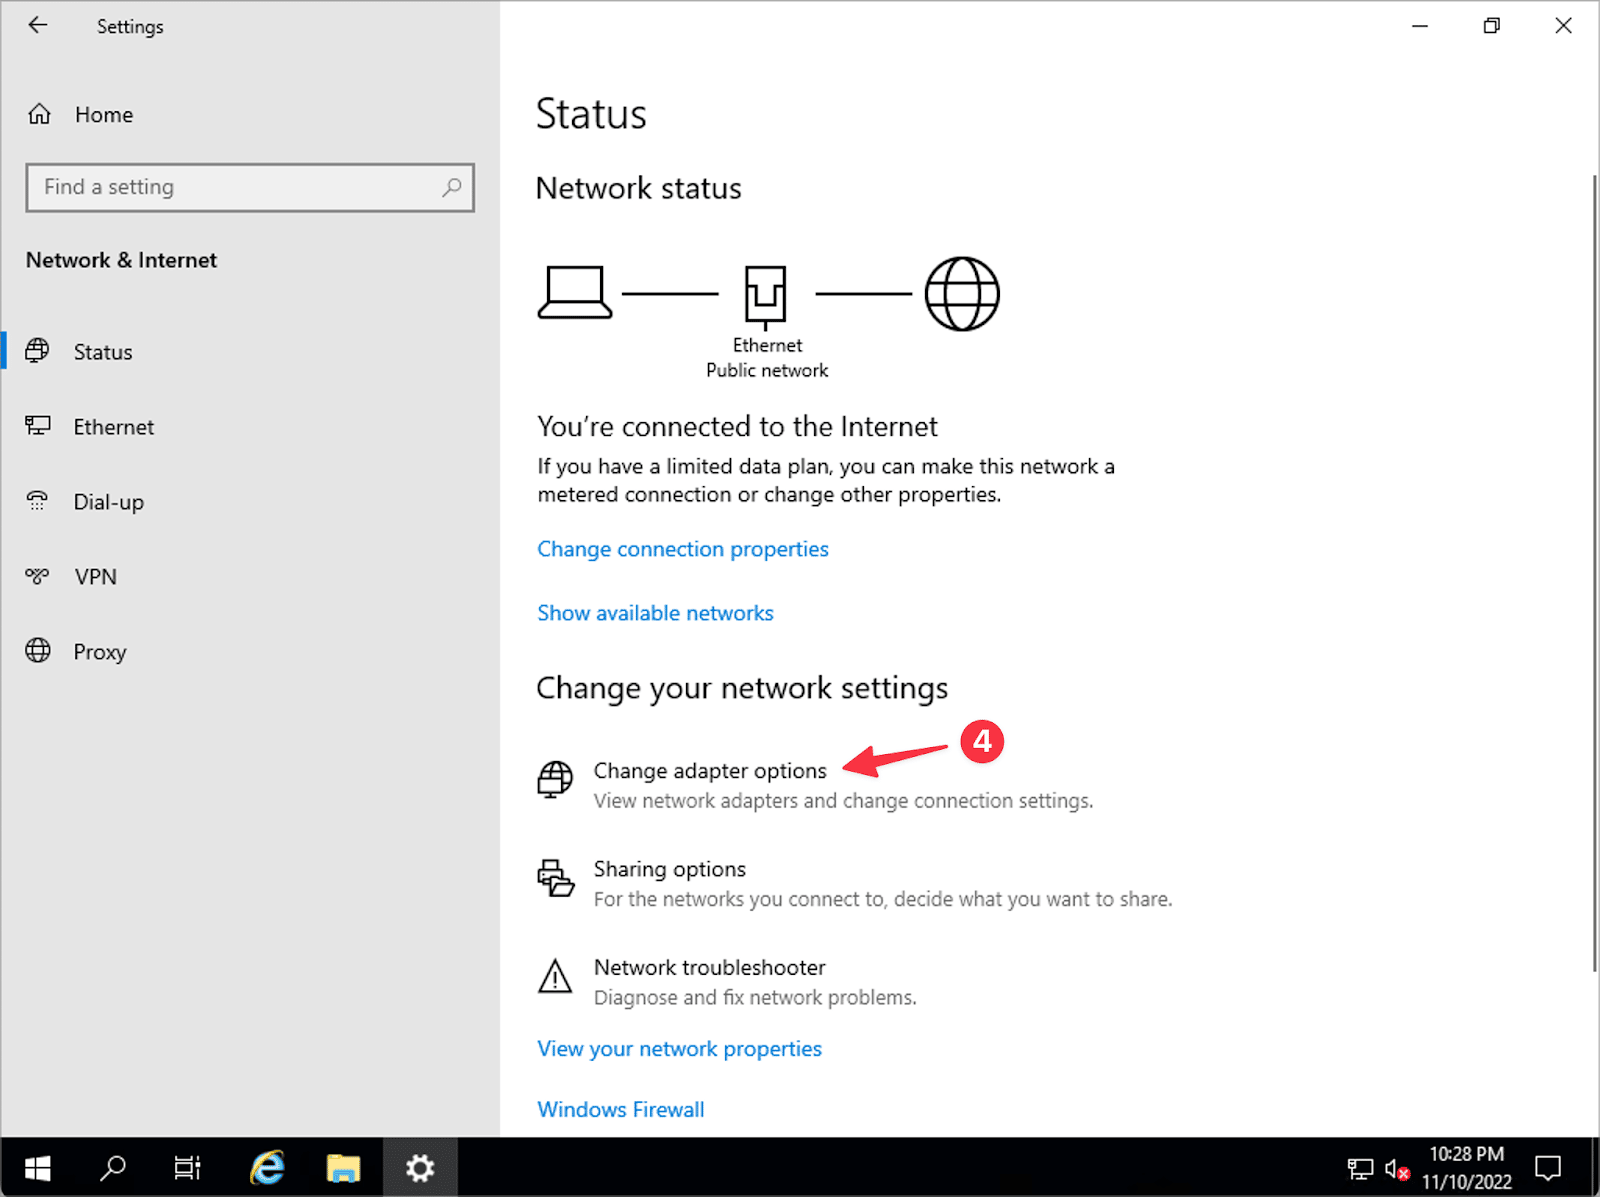
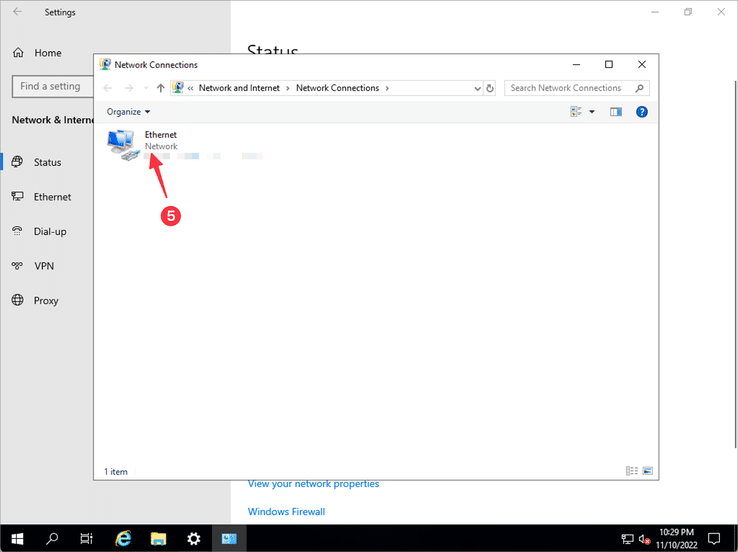
Select “Change adapter options” (4), then open the network interface settings by double clicking on your network interface adapter (5) [the name of this may vary, but will be “Ethernet” or similar]. If you are unsure, please contact support for assistance in identifying the correct network adapter.
The network status window will appear. Click on the “Properties” button (6).
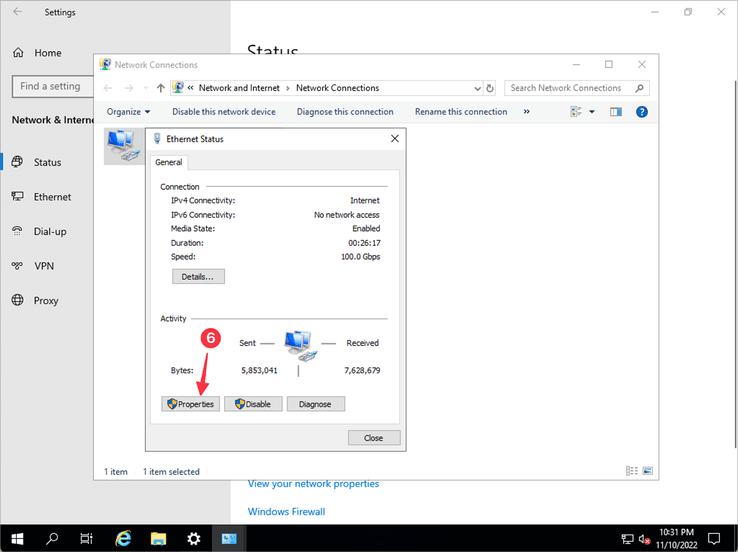
Next, select “Internet Protocol Version 4 (TCP/IPv4)” from the list (7), and click “Properties” (8) to open the IPv4 configuration for the server.
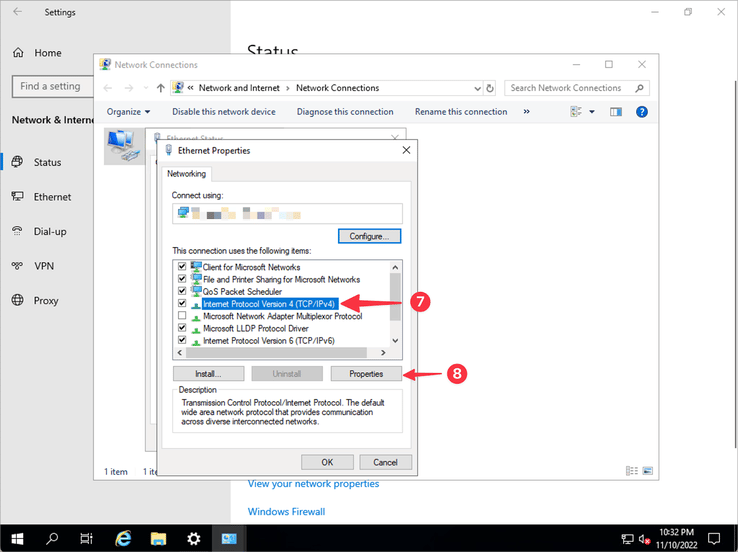
You can now enter the new IP address provided by support. Both the IP Address (9) and the Default Gateway (10) will need to be updated.
If you are unsure of the new Default Gateway to use, simply add 1 to the value of the last octet of your new allocated subnet. For example, if your subnet allocation is 1.2.3.0/29, the default gateway allocated is 1.2.3.1, and your first usable IP address is 1.2.3.2. Your subnet mask is unchanged (for a /29, this is 255.255.255.248).
After completing the step above, the next action will cause the server to stop responding on the old IP address, and instead start responding on the new IP address. If you are ready to complete this task, noting that there may be up to 1 minute of service disruption while Windows applies the new configuration, then you can complete the change by clicking “OK” (11).
Important Note: At this point, your server will stop responding on the old IP address and will instead start responding on the newly assigned and configured IP address. Please re-connect to the server using the new IP address to continue re-configuring any server applications that might need to be adjusted. Configuration changes for specific application servers is outside the scope of this document, but for assistance you can contact our support team who will be happy to try and assist you with these steps.
At this stage your server has been successfully renumbered and no further action is required. If you have any additional subnets routed to this server, please contact support to complete re-routing of those subnets.
Ubuntu Server
Applicable to the following operating systems:
- Ubuntu Server 22.04 LTS (and 22.10)
- Ubuntu Server 20.04 LTS (and 20.10)
- Ubuntu Server 18.04 LTS (and 18.10)
Step by Step Process – via SSH (Secure Shell)
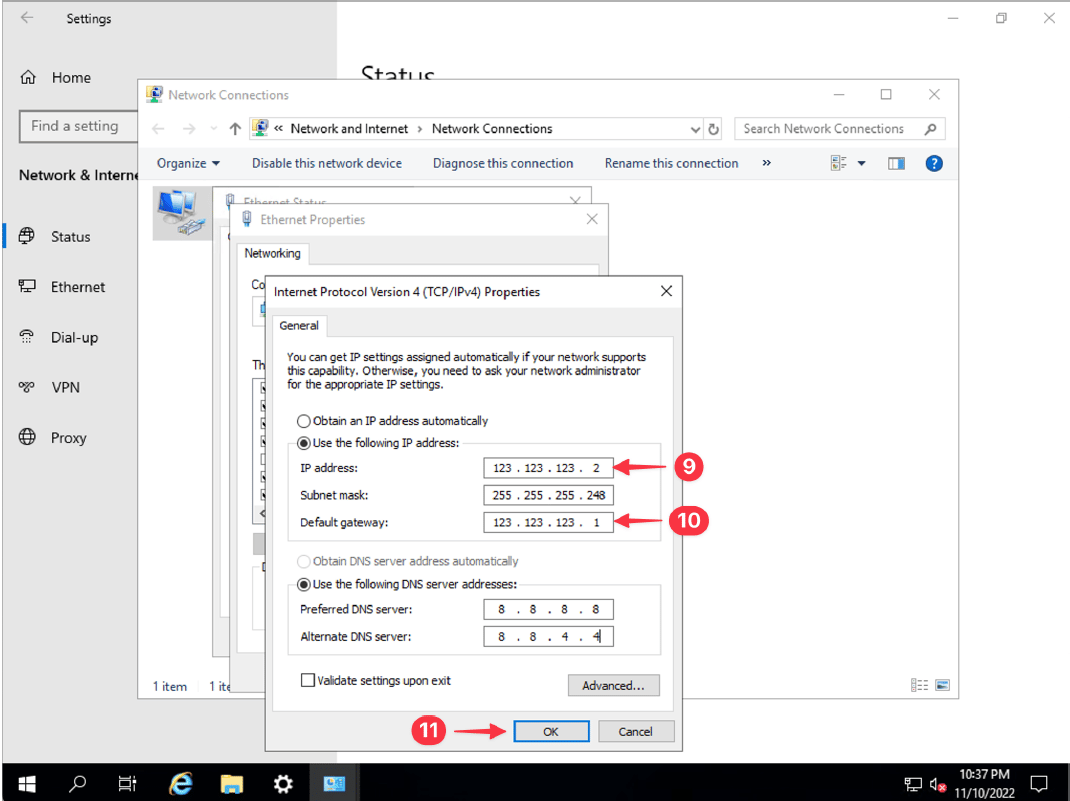
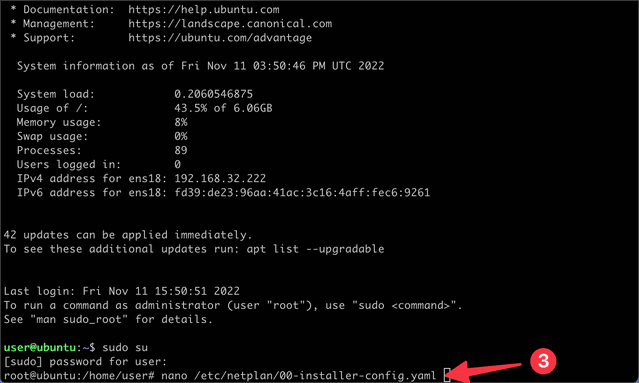
First, log in to your server via SSH. You will require root permissions to complete the necessary steps to renumber the server. Once logged in, you can use the “sudo su” command (1) to become root in order to proceed. When prompted, enter the root password for the server (2). Please be cautious to closely follow the steps in this guide, the root user can change all system settings and any mistakes may cause disruption to your server.
Next, we will adjust the configuration of Netplan, the Ubuntu component responsible for network configuration. In this guide, we will use the nano editor to do this. Advanced users may prefer to use vi. The Netplan configuration is located in “/etc/netplan” and by default is named “00-installer-config.yaml”. To edit the file, enter the command “nano /etc/netplan/00-installer-config.yaml” (3) and hit enter. The configuration file will be opened in edit mode.
Move your cursor to the area shown using the arrow keys on your keyboard, and adjust the IP address to the newly assigned IP address (5). The subnet mask (in this case, /29) will be unchanged. The gateway address must be adjusted too (6).
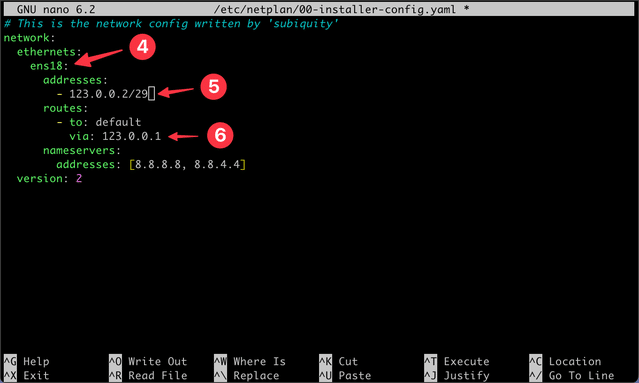
If you are unsure of the new default gateway to use, simply add 1 to the value of the last octet of your new allocated subnet. For example, if your subnet allocation is 1.2.3.0/29, the default gateway allocated is 1.2.3.1, and your first usable IP address is 1.2.3.2. Your subnet mask is unchanged (for a /29, this is 255.255.255.248).
Note that your network interface name (4), in our case ens18, may be different depending on your server. If you have more than one Ethernet interface listed in this file, you can compare the IP address shown to the old assigned IP address to ensure you update the configuration on the correct interface.
To save the changes, use the following key combinations:
- Control + O, then press enter (to save the file)
- Control + X, to quit nano and return to the command line
We can now apply the updated IP address. Note that this step will cause your server to stop responding on the old IP address and switch to the new IP address, and will also cause your SSH session to be dropped. Once you are ready to proceed, use the “netplan apply” command to complete the change. The server will stop responding on the old IP address and will begin responding on the new IP address and your SSH connection will be lost.

Finally, reconnect to your server using SSH to the new IP address. You will need to complete any other configuration changes necessary (such as changing configuration of web servers, mail servers or other server applications).
Further documentation and assistance is available from the Ubuntu Server documentation here: Network – Configuration | Ubuntu . Alternatively, please contact our support team if you need any additional help.
CentOS
Applicable to the following operating systems:
- CentOS 7
- CentOS Stream 7
- CentOS Stream 8
- Recent versions of Red Hat Enterprise Linux (RHEL)
Step by Step Process – via SSH (Secure Shell)
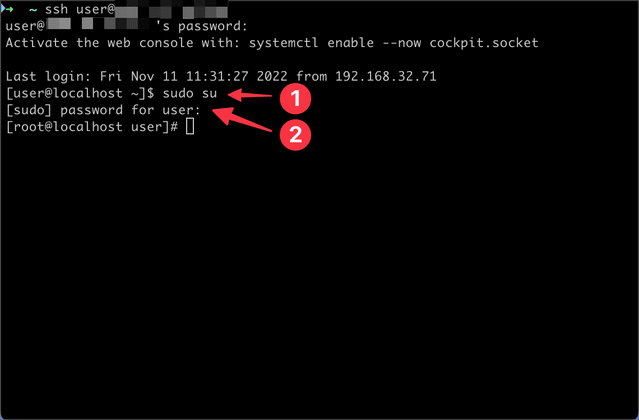
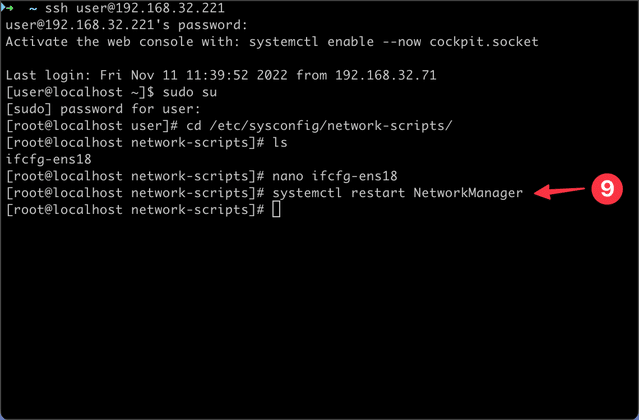
First, log in to your server via SSH. You will require root permissions to complete the necessary steps to renumber the server. Once logged in, you can use the “sudo su” command (1) to become root in order to proceed. When prompted, enter the root password for the server (2).
Important Note: Follow the steps in this guide very closely. The root user can change all system settings and any mistakes may cause issues with your server.
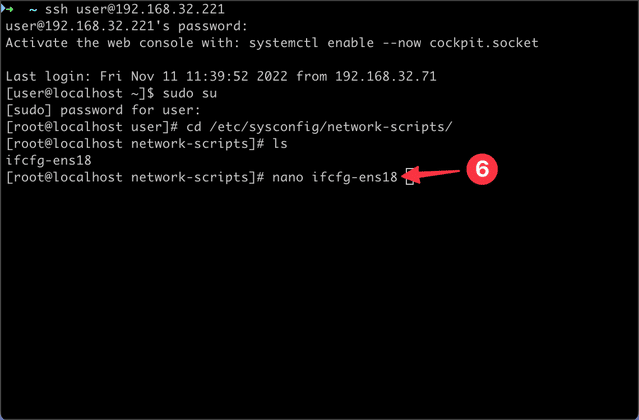
Next, we will locate the correct configuration file to adjust. Network configuration files on CentOS are located in “/etc/sysconfig/network-scripts”, Switch to that directory using the “cd /etc/sysconfig/network-scripts” (3) command, and use “ls” (4) to show the files in the directory. One file is shown, the configuration for our network interface “ens18” with the filename “ifcfg-ens18” (5).

We’ll end this configuration file using the nano editor, using the command “nano ifcfg-ens18” (6) in our example. Replace “ifcfg-ens18” with the correct filename for your server based on the output of ls (4). Advanced users may prefer to use the vi editor.
Next, move your cursor to the area shown below using the arrow keys on your keyboard. Adjust the IP address to the newly assigned IP address (7). The subnet mask (in this case, 29) will be unchanged. The gateway address must be adjusted too (8).
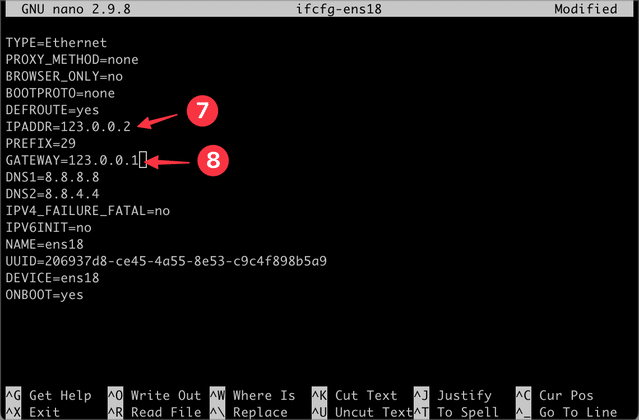
If you are unsure of the new default gateway to use, simply add 1 to the value of the last octet of your new allocated subnet. For example, if your subnet allocation is 1.2.3.0/29, the default gateway allocated is 1.2.3.1, and your first usable IP address is 1.2.3.2. Your subnet mask is unchanged.
To save the changes, use the following key combinations:
- Control + O, then press enter (to save the file)
- Control + X, to quit nano and return to the command line
We can now apply the updated IP address. Note that this step will cause your server to stop responding on the old IP address and switch to the new IP address, and will also cause your SSH session to be dropped. The command used depends on the version of CentOS you are running:
CentOS Stream 8 (and newer)
Once you are ready to proceed, use the “systemctl restart NetworkManager” (9) command to complete the change.
CentOS 7 and CentOS Stream 7 (and older)
Once you are ready to proceed, use the “systemctl restart network” command to complete the change. No screenshot of this is shown, but the same result can be expected as shown here.
The server will stop responding on the old IP address and will begin responding on the new IP address and your SSH connection will be lost.
Finally, reconnect to your server using SSH to the new IP address. You will need to complete any other configuration changes necessary (such as changing configuration of web servers, mail servers or other server applications).
Additional guidance can be found in the Red Hat Enterprise Linux handbook: Configuring and managing networking Red Hat Enterprise Linux 8 | Red Hat Customer Portal.
Please contact our support team if you need any additional help.
Was this page helpful?
About the author