How To Install MySQL on Ubuntu

MySQL is a notable, open-source, and efficient Relational Database Management System (RDBMS) that structures data into one or more data tables where data types may be associated. MySQL is a powerful database server that is reliable, scalable, multi-threaded, and multi-user. It is designed for high-volume complex systems. This article will guide you through installing a secure MySQL server on Ubuntu.
What is MySQL?
The MySQL (Structured Query Language) RDBMS is the most widely used open-source application, with about 46% of developers using it worldwide. It is an integral part of the LAMP Stack, which serves as the framework for many Ubuntu systems.
This stack includes Linux, the Apache web server, MySQL RDBMS, and the PHP / Python/ Perl programming language. These programs collectively facilitate the development of software, web applications, and other technical projects. MySQL is used by YouTube, Google, Netflix, NASA, Flickr, GitHub, Twitter, Wikipedia, Uber, Zendesk, Tesla, and many other users.
How to Install MySQL Ubuntu
For MySQL database host on Ubuntu, you must have the following available:
- Access to a terminal (Ctrl + Alt + T)
- A user account with sudo privileges
- A system running Ubuntu 20.04
- A network connection
Installing MySQL on Ubuntu 20.04
To host MySQL databases on Ubuntu 20.04, you must install the MySQL Server package. You can install MySQL Server on Ubuntu 20.04 using the following simple steps below:
Update Package Repository and Install MySQL
Step 1: Run the following command after opening the terminal.
sudo apt updateStep 2: Enter your password and wait for the update to complete. Execute the subsequent command next:
sudo apt upgradeStep 3: When asked to proceed with the upgrade, type Y and click ENTER. After you have updated the package repository, you can install MySQL.
Step 4: To install MySQL Server, enter the following command:
sudo apt install mysql-serverStep 5: When the system prompts you to continue the installation, click Y and press ENTER. The result should look like the following:
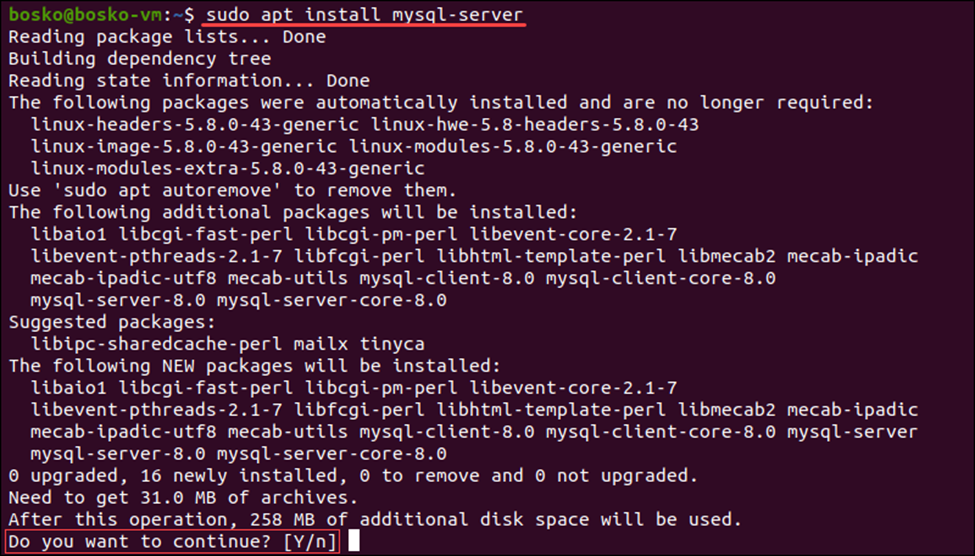
Step 6: The system will download and install the MySQL Packages on the specified machine.
Step 7: The next step is to execute the following command to see if MySQL was successfully installed:
mysql --versionStep 8: The output will show the version of MySQL that is being installed on your computer as follows:

Configure the MySQL Installation
Step 1: Run the DBMS’s Included Security Script if you’re installing MySQL for the first time. This script will adjust less secure default settings for features like sample users and remote root logins. Use sudo to execute the security script as follows:
sudo mysql_secure_installationStep 2: You can modify the security settings for your MySQL installation by following the prompts presented to you as you do this.
The first prompt will ask you if you want to set up the Valid Password Plugin, which may be used to check the quality of new MySQL users’ passwords before considering them valid.
Step 3: You can choose the strongest policy level for the Valid Password Plugin by entering 2. Passwords must be at least 8 characters long and contain a combination of numeric, lowercase, uppercase, and special characters.
Securing the MySQL server deployment.
Connecting to MySQL using a blank password.
VALIDATE PASSWORD COMPONENT can be used to test passwords
and improve security. It checks the strength of password
and allows the users to set only those passwords which are
secure enough. Would you like to setup VALIDATE PASSWORD component?
Press y|Y for Yes, any other key for No: Y
There are three levels of password validation policy:
LOW    Length >= 8
MEDIUM Length >= 8, numeric, mixed case, and special characters
STRONG Length >= 8, numeric, mixed case, special characters and dictionary                  file
Please enter 0 = LOW, 1 = MEDIUM and 2 = STRONG: 2
Step 4: The following prompt will require you to create a root password for the MySQL user. Choose a password, then type it in and hit “enter”:
Please set the password for root here.

New password:
Re-enter new password:
Step 5: It is noteworthy that while you’ve given the MySQL root user a password, this user hasn’t yet been configured to authenticate using a password when connecting to a MySQL Shell.
Step 6: You can get feedback on the security of your new password if you use the Validate Password plugin. The script will then prompt you to choose between continuing with the password you typed and entering a new one. Consequently, press Y to continue the script if you are pleased with the password’s strength:
Estimated strength of the password: 100
Do you wish to continue with the password provided? (Press y|Y for Yes, any other key for No) : Y
Step 7: To accept the default answers to all the following questions, press Y and click ENTER. Consequently, some anonymous users and the test database will be deleted, root logins will be disabled, and these new rules will be loaded so that MySQL will immediately adhere to your modifications.
Your MySQL installation will be secured once this script is finished, after which you can create a dedicated user using the MySQL client.
Add a Dedicated MySQL User
Step 1: After installing MySQL, a root user account is generated that you can use to manage your MySQL account. The MySQL Server grants this user full privileges, giving it complete authority over all tables, databases, users, and other entities. It is advised against using this account for anything other than administrative purposes.
Step 2: The root MySQL user is configured by default on Ubuntu systems running MySQL 5.7 or later versions to authenticate using the auth socket plugin instead of a password. For this plugin to function, the operating system user launching MySQL must have the same name as the MySQL user provided in the command.
To gain access to the root MySQL Server, you should use MySQL with sudo privileges, as seen in the following snippet:
sudo mysqlStep 3: After gaining access to the MySQL prompt, you can create a new user by using the CREATE USER statement with the command shown below:
mysql> CREATE USER 'username'@'host' IDENTIFIED WITH authentication_plugin BY 'password';Step 4: After the CREATE USER statement, you must choose a username, a @ sign, and the hostname from which the user will connect. If your primary objective is to access this user locally, you can select localhost.
There are many possibilities when selecting the authentication plugin, but the previously mentioned auth socket plugin would function perfectly well.
Step 5: The next is to execute the following command to create a user that uses caching the sha2 password for authentication. Ensure to replace “Sammy” with your chosen username and password:
mysql> CREATE USER 'sammy'@'localhost' IDENTIFIED BY 'password';Grant Privileges to Secure MySQL
Step 1: Use the following syntax to grant user privileges::
mysql> GRANT PRIVILEGE ON database.table TO 'username'@'host';Step 2: The preceding command’s PRIVILEGE value specifies the user’s permissions for using the database and table in question. However, by separating them with commas, you can offer the same user numerous privileges in a single command. Also, the database and table names can be substituted with asterisks to allow users global privileges.
For example, you can execute the following GRANT statement to grant global user privileges, including the ability to ALTER, CREATE, DROP tables, databases, and users, as well as the ability to UPDATE, INSERT, and DELETE data from any table on the server and also SELECT, REFERENCES, and RELOAD:
GRANT CREATE, ALTER, DROP, INSERT, UPDATE, DELETE, SELECT, REFERENCES, RELOAD on *.* TO 'sammy'@'localhost' WITH GRANT OPTION;Step 3: The FLUSH PRIVILEGES command should be used next because it clears any memory that the server may have cached due to the former CREATE USER and GRANT statements below:
FLUSH PRIVILEGES;Step 4: After that, you can close the MySQL client by using the command below:
exitStep 5: Moving forward, you can use the command below to log in as your new MySQL user:
mysql -u sammy -pStep 6: The MySQL client will request your MySQL user’s password when you use the -p flag to authenticate.
Test MySQL to Check if it is Running
Step 1: You can run the following command to test MySQL and assess the connection’s status
systemctl status mysql.serviceStep 2: The above command will produce something that looks like this as its output:
mysql.service - MySQL Community Server
     Loaded: loaded (/lib/systemd/system/mysql.service; enabled; vendor preset: enabled)
     Active: active (running) since Tue 2020-04-21 12:56:48 UTC; 6min ago
   Main PID: 10382 (mysqld)
     Status: "Server is operational"
      Tasks: 39 (limit: 1137)
     Memory: 370.0M
     CGroup: /system.slice/mysql.service
             └─10382 /usr/sbin/mysqld
Step 3: If MySQL isn’t running, you can use the command sudo systemctl status MySQL to start MySQL. You might try connecting to the database using the MySQL admin program (a client that enables you to carry out administrative activities) as an additional check.
For example, this command instructs the server to establish a connection as the Dmitri user, request for the password, and display the version:
sudo mysqladmin -p -u Dmitri versionStep 4: Using the above command, you should get the following result:
mysqladmin  Ver 8.0.19-0ubuntu5 for Linux on x86_64 ((Ubuntu))
Copyright (c) 2000, 2020, Oracle and/or its affiliates. All rights reserved.

Oracle is a registered trademark of Oracle Corporation and/or its affiliates. Other names may be trademarks of their respective owners.

Server version        8.0.19-0ubuntu5
Protocol version    10
Connection        Localhost via UNIX socket
UNIX socket        /var/run/mysqld/mysqld.sock
Uptime:            10 min 44 sec

Threads: 2  Questions: 25  Slow queries: 0  Opens: 149  Flush tables: 3  Open tables: 69  Queries per second avg: 0.038
This output serves as proof that MySQL is running.
Log in to your MySQL Server
Step 1: Run the following command to complete logging into the MySQL interface.:
sudo mysql -u root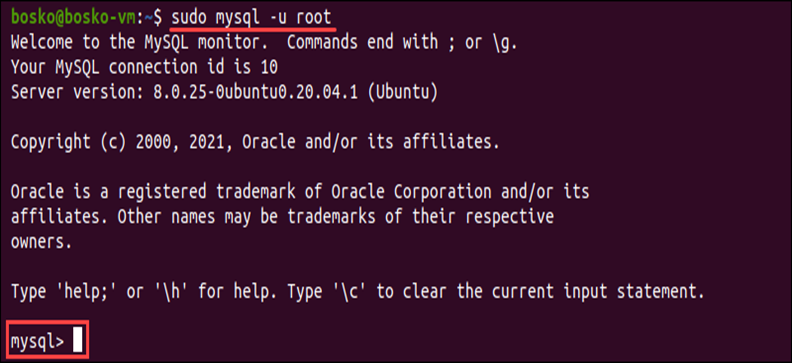
Step 2: You can quickly test your new MySQL configuration by creating databases, running queries, and more.
Conclusion
We have provided detailed and step-by-step instructions on installing MySQL Workbench Ubuntu easily. Your system should be running a perfectly functioning MySQL server by now. Try out some of MySQL’s many features and explore its limitless potential.
Do you want to host your own Ubuntu dedicated server? Visit ServerMania to learn more about our services and the Ubuntu Server system requirements.
Was this page helpful?
About the author

