How to Install, Setup & Use Nextcloud
![]()
Nextcloud is a powerful piece of software that allows you to create your own alternative to things like Dropbox cloud storage, Google calendar and contact syncing, Trello boards, Microsoft Office online document editing and much more all in a single interface, hosted on your own secure server. It’s a cloud tool that can be expanded with hundreds of different add-on apps as well.
In this article, we’ll show you how to install Nextcloud on a ServerMania cloud server using Ubuntu. The instructions will be similar for Debian or CentOS.
What is Nextcloud?
Nextcloud is an open-source software for storing files on a remote server and syncing them between all of your devices. It gives you the power to create your own Dropbox or Google Drive setup. Nextcloud allows you to:
- Share filders and folders
- Sync contacts and calendars
- Conduct secure voice and video calls
- View and edit documents
With an expansive library of addons, Nextcloud is a very powerful tool for those who are privacy-focused and want total control of their data.
Nextcloud Pricing
You might be wondering, with so many features, is nextcloud free? The answer of course is yes! It’s completely open-source so there is no cost associated with Nextcloud. All that you need is a server to install it on!
Nextcloud System Requirements
In order to run Nextcloud, you’ll need a Cloud or Dedicated Server with:
- 2GB of RAM
- 2 CPU cores
- Debian, CentOS, or Ubuntu
- Sufficient disk space to backup your files
- A domain name to use for the server. This can be a subdomain of your primary domain name.
Depending on the size of the cloud storage you will be maintaining, your requirements may vary.
See Also: How to Install Docker on Ubuntu

NextCloud Installation
Step 1: SSH into the server
We’ll begin by logging into the server via ssh to the root user:
ssh root@IP-Address 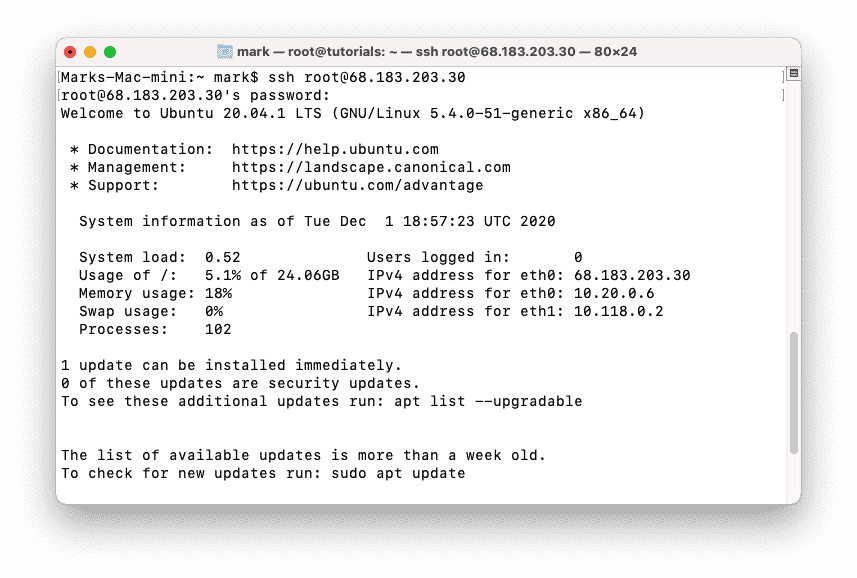
Step 2: Install Docker
We’ll start by updating the apt repository and downloading the required software:
apt update && apt install -y apt-transport-https ca-certificates curl gnupg-agent software-properties-common

Add the Docker GPG key:
curl -fsSL https://download.docker.com/linux/ubuntu/gpg | apt-key add –
Setup the stable repository:
add-apt-repository “deb [arch=amd64] https://download.docker.com/linux/ubuntu $(lsb_release -cs) stable”
Update the repository and install Docker CE:
apt update && apt install -y docker-ce docker-ce-cli containerd.io
We’ll then install Docker Compose:
curl -L “https://github.com/docker/compose/releases/download/1.25.4/docker-compose-$(uname -s)-$(uname -m)” -o /usr/local/bin/docker-composechmod +x /usr/local/bin/docker-composedocker compose –version
Step 3: Install Nextcloud
Create the Docker network:
docker network create nextcloud_network
Create the docker compose file:
nano docker-compose.yml
Paste the following content into the file:
Replace the MySQL root password and user password, your domain, and your Nextcloud admin username / password in the file:
version: ‘3’ services: proxy: image: jwilder/nginx-proxy:alpine labels: – “com.github.jrcs.letsencrypt_nginx_proxy_companion.nginx_proxy=true” container_name: nextcloud-proxy networks: – nextcloud_network ports: – 80:80 – 443:443 volumes: – ./proxy/conf.d:/etc/nginx/conf.d:rw – ./proxy/vhost.d:/etc/nginx/vhost.d:rw – ./proxy/html:/usr/share/nginx/html:rw – ./proxy/certs:/etc/nginx/certs:ro – /etc/localtime:/etc/localtime:ro – /var/run/docker.sock:/tmp/docker.sock:ro restart: unless-stopped letsencrypt: image: jrcs/letsencrypt-nginx-proxy-companion container_name: nextcloud-letsencrypt depends_on: – proxy networks: – nextcloud_network volumes: – ./proxy/certs:/etc/nginx/certs:rw – ./proxy/vhost.d:/etc/nginx/vhost.d:rw – ./proxy/html:/usr/share/nginx/html:rw – /etc/localtime:/etc/localtime:ro – /var/run/docker.sock:/var/run/docker.sock:ro restart: unless-stopped db: image: mariadb container_name: nextcloud-mariadb networks: – nextcloud_network volumes: – db:/var/lib/mysql – /etc/localtime:/etc/localtime:ro environment: – MYSQL_ROOT_PASSWORD=password – MYSQL_PASSWORD=mysql – MYSQL_DATABASE=nextcloud – MYSQL_USER=nextcloud restart: unless-stopped app: image: nextcloud:latest container_name: nextcloud-app networks: – nextcloud_network depends_on: – letsencrypt – proxy – db volumes: – nextcloud:/var/www/html – ./app/config:/var/www/html/config – ./app/custom_apps:/var/www/html/custom_apps – ./app/data:/var/www/html/data – ./app/themes:/var/www/html/themes – /etc/localtime:/etc/localtime:ro environment: – VIRTUAL_HOST=nextcloud.YOUR-DOMAIN – LETSENCRYPT_HOST=nextcloud.YOUR-DOMAIN – LETSENCRYPT_EMAIL=YOUR-EMAIL restart: unless-stoppedvolumes: nextcloud: db:networks: nextcloud_network:
Then you can run the installation:
docker-compose up -d
Step 4: Complete the Web Installation
You can no go to the domain you configured above in order to complete the Nextcloud installation. You will begin by providing an admin account and identifying which apps to install:
Enter your admin username and password, then select MySQL and enter the database name, username and password. Change “localhost” to “db”.

Click Finish setup to complete the install process. Nextcloud will show its progress through the install process on the next page.

Once the installation is complete, you can now begin using Nextcloud!
Next Steps
Now that your Nextcloud is installed, you can begin adding apps and customizing the interface to your exact needs. Check out the rest of our knowledge base to read more server tutorials to help you get started with your server!
Was this page helpful?
About the author

