How to Install Remove Server Administrative (RSAT) Tools in Windows 10
Remote Server Administration Tools (RSAT) are a collection of tools for remotely managing Windows machines. An administrator can use RSAT to manage features, roles, and role services.
RSAT is not installed on computers by default and can only be installed on Professional or Enterprise editions of the Windows machine you want to remotely operate. Using RSAT from your Windows client device, you can manage Windows Servers from a machine running Windows 10 or Windows 7 SP1 operating system. In this article, you will learn how to install RSAT on Windows 10. If you are installing Windows 10 for the first time, make sure your system meets the minimum requirements for installing this OS. Alternatively, you can choose to host your Microsoft Windows server on a dedicated servers, such as the ones offered by ServerMania.
Using Microsoft Windows server tools offers network admins a range of benefits. These remote management tools for Windows 10 help save a great deal of time for system administrators. With Microsoft administration tools, you have the flexibility of managing and monitoring the system without being near the actual machine. With the help of RSAT role administration tools, directory tools, services tools, and other administration tools in Windows, you can create new users, modify user grants & privileges, reset user passwords, and more from any remote location, as long as you have a stable connection to the internet. Microsoft Windows administration tools can be used, not only from your Desktop PC or your laptop but can also be used from a smartphone or a tablet. For more information about RSAT compatibility for different operating systems, please reference the official documentation.
Your system administrators can much better spend their time on improving processes and solving operational challenges. So with that in mind, let’s install Remote Server Administration Tools. There are two ways to install RSAT on a Windows 10 machine:
See Also: (Live Webinar) Meet ServerMania: Transform Your Server Hosting Experience
Installing RSAT on Windows 10 using Windows Settings
Since the October 2018 Windows Update, RSAT comes included as a set of on-demand features, which means that you don’t need to download RSAT online. To get started, click on the Start Menu → Settings → Apps. You will arrive at the list of Apps & Features. The default view will list the installed apps on your system. The list will be preceded by two links → Optional features & App execution aliases.
Use the Optional features link to see the list of installed features. As mentioned already, RSAT is an optional feature, so it is not installed by default. Click the Add a feature button, which is found right above the list. It will open a search dialog box. It will list all the features available for installation. Just search features related to RSAT by typing ‘RSAT’ in the search box.
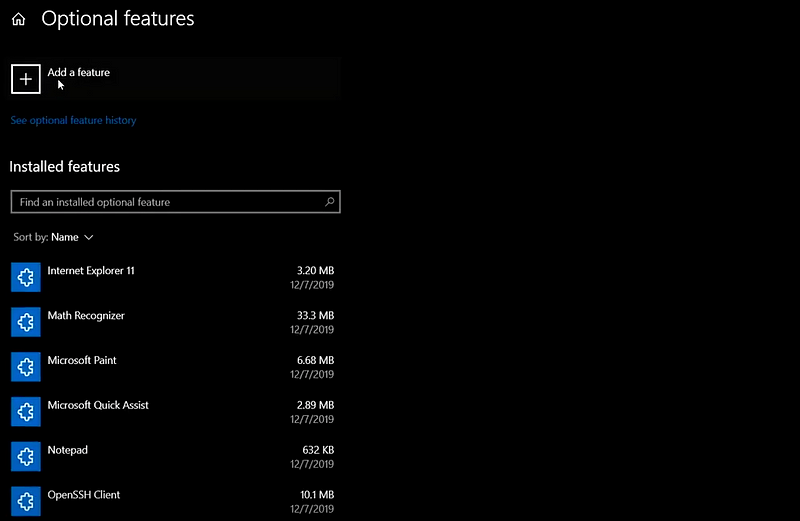 — Click Add a feature —
You don’t have to install the whole set of tools. You can selectively choose the tools and install them. For instance, you can choose RSAT: DNS Server Tools and RSAT: DHCP Server tools only and install these. Once the installation is complete, you can go to Windows Administrative Tools to verify if the installation has been successful and see whether the Remote Server Administration Tools are available for use.
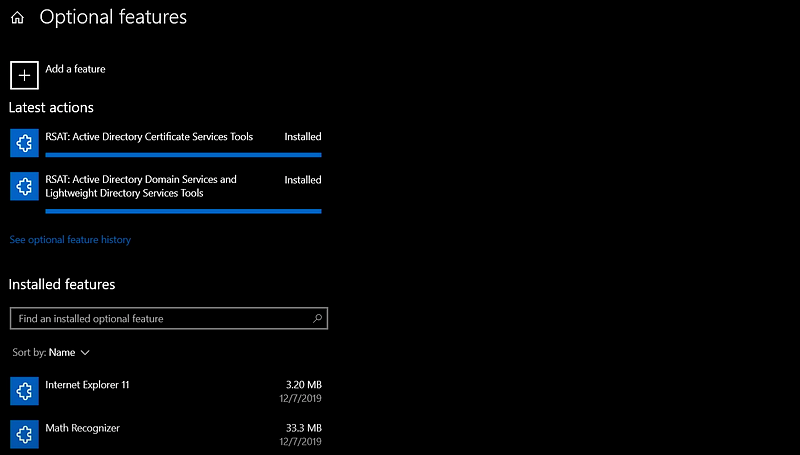 — Installed additional features —
As you can see, the Add a feature button can be used to selectively manage optional features and turn windows features on. These features can range anywhere from active directory domain services to group policy management, and from remote desktop administration to lightweight directory management. You can look into the full list of optional features related to Remote Server Administration Tools in different versions of Windows in the official documentation.
Installing RSAT on Windows 10 using PowerShell
RSAT for Windows 10 can also be installed using the command line, i.e., Windows PowerShell. For power users, using command-line tools is usually a preferable option when compared with the GUI alternative. The fact that the complete installation is scriptable makes this option so attractive to the power users.
Using PowerShell cmdlets to List Administration Tools for Windows
Open a PowerShell terminal and use one of the Windows PowerShell cmdlets called WindowsCapability module to find the list of optional features that contain the phrase RSAT:
Get -WindowsCapability -Online -Name “Rsat*”
Selecting Properties of Optional Features
The above command will list all the properties of the optional feature. The properties include description, capability name, sample package name, satellites, install size, and availability (OS-availability). For instance, let’s look at all the properties listed for the RSAT component used to manage the Remote Access role on Windows Server:
Description: Graphical and PowerShell tools for managing the Remote Access role on Windows ServerDependencies: Rsat.ServerManager.Tools, Rsat.GroupPolicy.Management.ToolsCapability name: Rsat.RemoteAccess.Management.Tools~~~~0.0.1.0Sample package name: Microsoft-Windows-RemoteAccess-Management-Tools-FoD-Package~31bf3856ad364e35~amd64~~.cabSatellites: YesInstall size: 27.70 MBAvailability: Windows 10, version 1809 and later
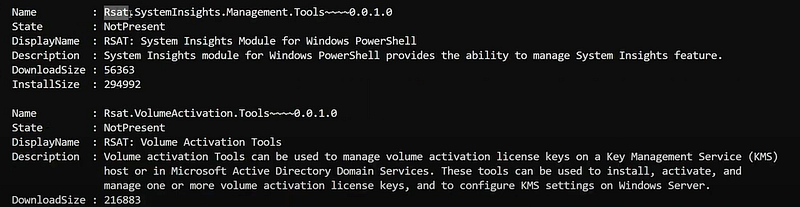 –Example Image–
Reducing Wealth of Properties Output
To reduce the long output list slightly, you can choose to select some of the properties by using the following command:
Get -WindowsCapability -Online -Name “Rsat*” | select name,description | fl
The output of the command above will result in a list that will contain some of the following entries, and more:
Name : Rsat.ActiveDirectory.DS-LDS.Tools~~~~0.0.1.0Description : For remotely managing AD DS and AD LDS on Windows ServerName : Rsat.BitLocker.Recovery.Tools~~~~0.0.1.0Description : Tools for managing BitLocker Drive Encryption FeaturesName : Rsat.Dns.Tools~~~~0.0.1.0Description : DNS MMC snap-in, dnscmd.exe command-line tool, and Windows PowerShell module for DHCP ServerName : Rsat.GroupPolicy.Management.Tools~~~~0.0.1.0Description : Group Policy Management Console, GP Management Editor, and GP Started GPO Editor
Choosing Remote Server Administration Tools Features to Install
Just like in the GUI management console, you can choose the features you want to install. For instance, to install all the features related to RSAT on Windows 10, you can simply run the following command:
Get -WindowsCapability -Online -Name “Rsat*” | Add-WindowsCapability -Online
On the other hand, if you want to be selective and install either a single package or a group of related packages, you can use one of the following commands:
Get -WindowsCapability -Online -Name “Rsat.Dns.Tools~~~~0.0.1.0” | Add-WindowsCapability -OnlineGet -WindowsCapability -Online -Name “Rsat*Dns” | Add-WindowsCapability -Online
Verifying Installed Server Administration Tools Features
Once the installation is done, you can verify the installation by running the following command which lists the installed features:
Get -WindowsCapability -Online -Name “Rsat*” | where -Property state -eq installed | select displayname,name,description
Using PowerShell cmdlets is a simple method to install and verify additional features. Alternatively, you can always go to Windows Administrative Tools and check if the new features have been installed and are visible there.
Ready To Get Going
With the above information in your hand, you should now be able to install RSAT on your own Windows 10 machine using one of the two methods discussed. This will enable you to manage your Windows server effectively from any remote location given you have a stable internet connection.
Are you looking for a dedicated server to run all of this on? Simply contact our team of server experts, who will be more than happy to help you get started.
Was this page helpful?
About the author