How To Install and Configure Redis on Ubuntu
In this article, we’ll show you how to install Redis on your Ubuntu server.
Redis is an open source (BSD licensed), in-memory data structure store, used as a database, cache and message broker. It has a variety of advantages including:
- Support for multiple data structures
- Built in master/slave asynchronous data replication

Prerequisites
In order to install Redis, you will need a Hybrid, Cloud, or Dedicated Server. We offer a wide variety of solutions at ServerMania.com for you to choose from.
This article was created using Ubuntu 16.04. Instructions may vary for other versions.
We’ve outlined the system requirements below, and believe that a dedicated server will offer the best performance for your Redis server.
Not sure which server to choose? Book an expert consultation today and we’ll find the perfect server for your needs.
Redis System Requirements
The following server specs are recommended for a production Redis server:
Minimum System Requirements
- 4 CPU Cores
- 16GB RAM
- Two Storage Devices
- 1GBps Network Connection
Recommended System Requirements
- 8 CPU Cores
- 32GB RAM
- Redundant SSD Based storage with RAID
- 1GBps Network Connection +
Redis Quick Installation
There are several scripts available on github in order to automate the installation of Redis in just a few steps. We’ve included this process, as well as the full installation process for those interested.
Step 1: Login to the server via SSH
ssh ubuntu@IP
Step 2: Change to the root user
sudo su
Step 3: Clone the git project
git clone https://gist.github.com/2b98f0b128d94811e43f86412dc375a1.git
Step 4: Change into the directory
cd 2b98f0b128d94811e43f86412dc375a1
Step 5: Set the correct permissions
chmod 755 install-redis.shStep 6: Execute the script
./install-redis.sh
Redis Full Installation
Step 1: Login to the server via SSH
ssh ubuntu@IP
Step 2: Change to the root user
sudo su
Step 3: Update to latest repositories
apt-get update
Step 4: Download the dependancies
apt-get install -y build-essential tcl
Step 5: Change into the /tmp directory
cd /tmp
Step 6: Download the latest stable version of Redis
curl -O http://download.redis.io/redis-stable.tar.gz
Step 7: Unpack the tar file
tar xzvf redis-stable.tar.gz
Step 8: Change into the Redis directory
cd redis-stable
Step 9: Compile Redis
make
Step 10: Test to ensure everything was built correctly
make test
Step 11: Install the required binaries
make install
Redis Configuration
Step 1: Create the configuration directory
mkdir /etc/redis
Step 2: Copy the sample configuration file
cp /tmp/redis-stable/redis.conf /etc/redis
Step 3: Open the configuration file in your text editor of choice
vi /etc/redis/redis.conf
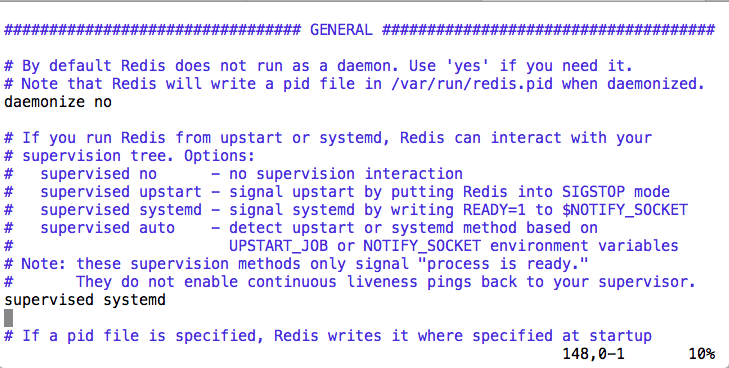
Step 4: Edit the configuration file
-Change the supervised mode to “systemd”
-Set the dir to /var/lib/redis
-Save and close the file

Step 5: Create the Redis systemd file
vi /etc/systemd/system/redis.service
Paste the following content:
[Unit]
Description=Redis In-Memory Data Store
After=network.target
[Service]
User=redis
Group=redis
ExecStart=/usr/local/bin/redis-server /etc/redis/redis.conf
ExecStop=/usr/local/bin/redis-cli shutdown
Restart=always
[Install]
WantedBy=multi-user.target
Save and close the file.
Step 6: Create the Redis Users
adduser --system --group --no-create-home redis
Step 7: Create the Redis directory
mkdir /var/lib/redis
Step 8: Give the Redis user permissions over the directory
chown redis:redis /var/lib/redis
Step 9: Prevent other users from accessing this directory
chmod 770 /var/lib/redis
Starting and Using Redis
Step 1: Start Redis
systemctl start redis
Step 2: Test Redis Functionality
redis-cli
Type “ping” and you should receive the following output:
![]()
Step 3: Enable Redis to start on boot
systemctl enable redis
Conclusion
Redis is now configured to run on your Ubuntu 16.04 server with ServerMania.
Was this page helpful?

