How to Setup Your Own VPN Server on Windows, MAC OS or IOS

It’s becoming more difficult every day to protect your privacy while browsing online. With more and more services being compromised on a daily basis, it is hard to be assured that your personal browsing data is safe.
Using a VPN is a great way of maintaining privacy by routing traffic through your very own VPN server. Instead of traffic routing directly to the website you are browsing, traffic is encrypted between your computer and the VPN server and then proceeds to the source website. This means that the destination sees all traffic as coming from your VPN server rather than your ISP, keeping your personal information secure.
Instead of paying for a VPN provider, you should consider creating your own VPN server. It’s a lot easier than it sounds and can be done in under 5 minutes.
In this article, we will show you how to setup OpenVPN on a ServerMania Server using Debian 9. Once your server is setup, you can connect to it from Windows 10, Mac OS, Android, iPhone, or any other device.
See Also: (Live Webinar) Meet ServerMania: Transform Your Server Hosting Experience
Why might I need a personal VPN server?
Making a personal VPN server is key to maintaining your privacy online. Every time you use a public WiFi network like in a coffee shop or hotel, you have no idea where your browsing data may be routed to.
When you create your own VPN server, the network you connect to will only see the connection established between your computer and your ServerMania server. This connection is encrypted, and the local network won’t have any idea what sites you are accessing.
Even when connected to your local ISP, you can’t be certain what browsing data your provider may release to third parties. By using a VPN, you can be assured that this data is secure.
Is it hard to create my own personal VPN server?
It’s actually really easy to setup your own cheap VPN server at ServerMania. It takes only a few minutes to setup a VPN. We’ll show you how in this article.
VPN Server System Requirements
The system requirements for setting up a VPN server with OpenVPN are fairly modest:
- A ServerMania Hybrid or Dedicated Server
- Debian 9 (although other Linux distributions are supported)
- 128MB of RAM – we recommend 1GB of RAM for other system services
- 10GB of disk space for OpenVPN and other system packages
Installation Overview
- We’ll begin by ordering a Hybrid Server at ServerMania. This is the server that will route all traffic through in order to setup your own VPN server.
- We’ll login to the server and install the software in a few steps.
- Finally, we will configure your local device to connect to the VPN server.
Instructions for Installing a Personal VPN Server
Step 1: Order Your Server
Begin by visiting ServerMania.com and ordering your server. For a personal VPN, we recommend the Hybrid mystery box server as it is an affordable option.
Step 2: Login to Your Server
To start the process of creating your own VPN, login to your server via SSH. We have tutorials on connecting via SSH using Mac or Windows.
ssh root@IP-AddressStep 3: Update the Server
We’ll update the repositories on the server:
apt-get updateStep 4: Install required programs
If your server does not have the wget program (used to download the installation script) we’ll download it now:
apt-get install wgetStep 5: Download the Installation Script
Next, we’ll download a popular OpenVPN installation script from github:
wget https://git.io/vpn -O openvpn-install.sh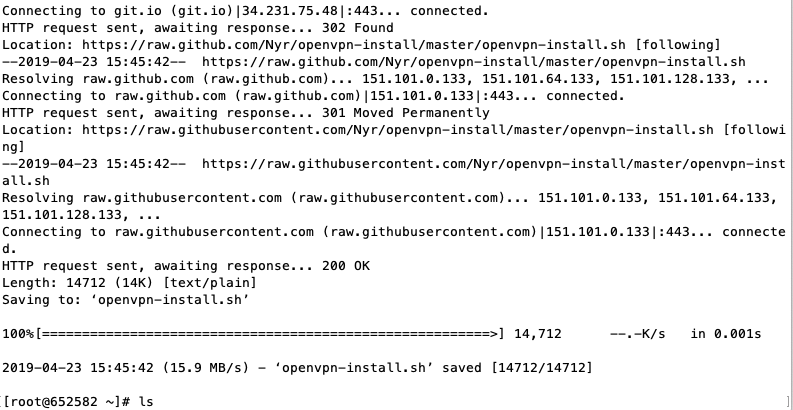
Step 6: Update file permissions
Let’s update the permissions on the file to make it executable:
chmod +x openvpn-install.shStep 7: Start the install process
Now to begin the install process by executing the installation script:
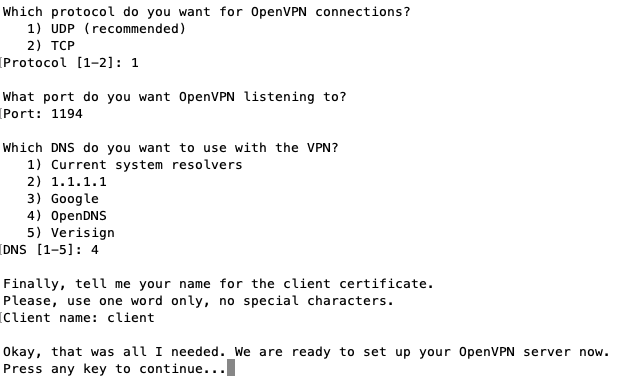
./openvpn-install.shEnter this information on the installation script:
- The primary IP of the server is automatically filled. Hit enter to proceed.
- Hit 1 to proceed with UDP installation.
- Hit enter to proceed on the default port.
- Enter the DNS provider you wish to use on the server. We recommend OpenDNS.
- Enter your name to be used when generating the client certificate and hit enter.
- Hit enter to proceed with the installation.
The script will install OpenVPN and generate all of the required keys for usage.
Step 8: Copy VPN Configuration File
Execute the following command and copy the data into a text file on your computer.
cat /root/client.ovpnSave the file as client.ovpn.
You can use scp to download the file on your local machine from the terminal
scp user@IP:/root/client.ovpn /Local/folderOnce downloaded, you can use this file in your favourite VPN client to connect.
Adding VPN Users
Each device that you use should have it’s own user on the VPN server to run reliably. You can run the following command to add users:
./openvpn-install.shSelection option 1, and generate a unique name for the device.
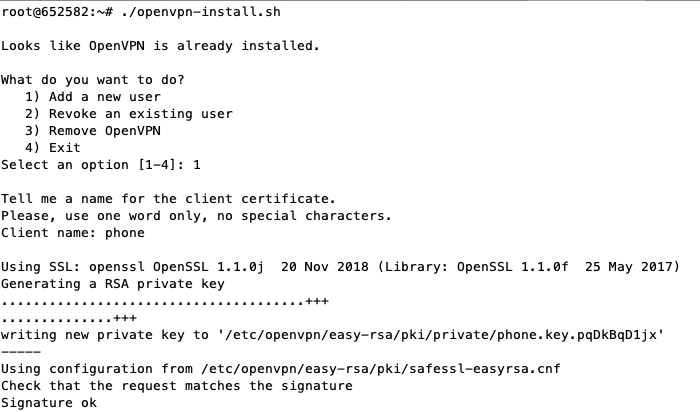
Copy the content from the configuration file to use it on your device. For example, if you named the client phone then you can run this command:
cat /root/phone.ovpnStarting, Stopping, and Restarting OpenVPN
After installation, OpenVPN will start automatically and will be set to start at boot. Here are the start and stop commands for your reference:
To start OpenVPN:
systemctl start openvpn@server.serviceTo stop OpenVPN:
systemctl stop openvpn@server.serviceTo restart OpenVPN:
systemctl restart openvpn@server.serviceAbout ServerMania
ServerMania has over a decade of experience building high-performance infrastructure hosting platforms for businesses globally. We offer a wide range of fully customizable dedicated, hybrid, cloud, colocation and IP Transit services.
Our mission is to empower clients by equipping them with fast, reliable, innovative infrastructure hosting while upholding a 100% network uptime SLA. This is assisted by a 24x7x365 rapid response team — one with some of the best response times in the industry.
Was this page helpful?
About the author

